이번 포스팅에서는 지난 두번의 포스팅을 통해 다룬 PCam 5C 모듈의 FPGA IP에 대해 분석해보겠습니다.
2021.05.19 - [Digital Logic/FPGA] - [Zybo z7-20 보드 실습] Pcam 5C 영상 출력 (MIPI - HDMI)
2021.05.21 - [Digital Logic/FPGA] - [Zybo z7-20 보드 실습] Pcam 5C 영상 출력 (OV5640 Register 제어)
PCam 5C 모듈에 대한 IP Source가 있어 카메라를 보드에 연결하고 HDMI로 실시간 영상을 볼 수 있었지만 이를 응용하고 다른 통신으로 제어하기 위해선 분석이 필수이므로 이번 시간을 통해 파헤쳐 보도록 하겠습니다.
원하는 모듈/프로젝트의 Design 결과를 분석할 때는 2가지가 가장 중요합니다.
'Power'와 'Timing'
'얼마나 적은 전력으로 동작시키는 가'와 '얼마나 적은 타이밍으로 동작시키는 가'가 관건입니다.
Power

총 1.9W가 소모되며 고정 값은 8%, 변동 값은 92%이다.
그 중 PS7(Processing System 7)이 가장 높은 비중을 차지하고 있다. 여기엔 video_dynclk, clk_wiz_0, MIPI_D_PHY_RX_0 등의 IP가 들어있다.
사실 대부분의 기능을 동작하는 요소가 PS7에 들어가 있어 소모 전력이 높다.
Timing

Timing 결과는 '-'이면 목표 타이밍보다 빨리 수행된 것이고, '+'이면 delay가 발생한 것이다.
그렇게 때문에 0 ns에 가까운 것이 좋다.
Utilization

MMCM, clock의 사용이 가장 높은 비중을 차지하고 IO, LUT 순으로 차지하고 있다.
각 요소들의 쓰임 및 정의는 아래 포스팅을 참고하면 좋다.
2021.04.11 - [Digital Logic/FPGA] - FPGA 란? (구조, 요소들의 기능)
IP Block design

Schematic

IP 파일 분석
IP_user_files - system
*모두 'Xilinx'에서 공유하는 오픈 소스이다.

- system_AXI_BayerToRGB_1_0.vhd
- system_AXI_GammaCorrection_0_0.vhd
- system_axi_vdma_0_0.vhd
- system_clk_wiz_0_0.v
- system_DVIClocking_0_0.vhd
- system_MIPI_CSI_2_RX_0_0.vhd*
- system_MIPI_D_PHY_RX_0_0.vhd*
- system_rgb2dvi_0_0.vhd
- system_rst_vid_clk_dyn_0.vhd
- system_v_axi4s_vid_out_0_0.vhd
- system_video_dynclk_0.vhd
- system_vtg_0.vhd
ipdefs - local
*개인이 제작한 소스이다.

- AXI_BayerToRGB
-- Purpose:
-- This component performs image conversion from Bayer to RGB ("Demosaic"), based on a 2x2 Bayer pixel matrix.
-- The component receives 4 pixels at a time, through its AXI Stream Slave interface. It outputs one pixel at a time, on the AXI Stream Master interface.
-- The component is designed as a pipeline, so once its input-to-output latency is covered, it will give out pixels every clock cycle, as long as it receives one pixel at its input at least every 4 clock cycles.
-- If the downstream AXI component backs off, this component will also stop receiving and processing new pixels, until the downstream AXI component is ready to receive data again.
-- If the upstream AXI component stops sending data, this component will also stop sending new data downstream, until it receives new data.
-- Component specifications:
-- Input sample format: Bayer (single color)
-- Input sample size: 10 bits
-- Input sample count: 4 at a time
-- Output sample format: RGB
-- Output sample size: 32 bits (10 bits per color) + 2 unused bits
-- Output sample count: 1 at a time
-- Maximum resolution: 2048 x <any value> pixels;
-- Input-to-output latency: 4 StreamClk cycles. - LineBuffer.vhd
-- Purpose:
-- This component is line buffer implemented in Block RAM. Its width is defined by kLineBufferWidth generic parameter. - AXI_GammaCorrection.vhd
-- Purpose:
-- This component performs image Gamma correction. The gamma correction factor is specified in the "StoredGammaCoefs" subcomponent header comments.
-- The component receives 1 pixel at a time, through its AXI Stream Slave interface. It outputs one pixel at a time, on the AXI Stream Master interface.
-- Component specifications:
-- Input sample format: RGB
-- Input sample size: 32 bits (10 bits per color)
-- Input sample count: 1 at a time
-- Output sample format: RGB
-- Output sample size: 24 bits (8 bits per color)
-- Output sample count: 1 at a time
-- Gamma factor value: Selectable among 1.0, 1.5, 1.8 and 2.2 values. - StoredGammaCoefs.vhd
-- Purpose:
-- This component is a ROM containing all the possible 8-bit pixel values for the following gamma correction factors: 1.0, 1.5, 1.8 and 2.2.
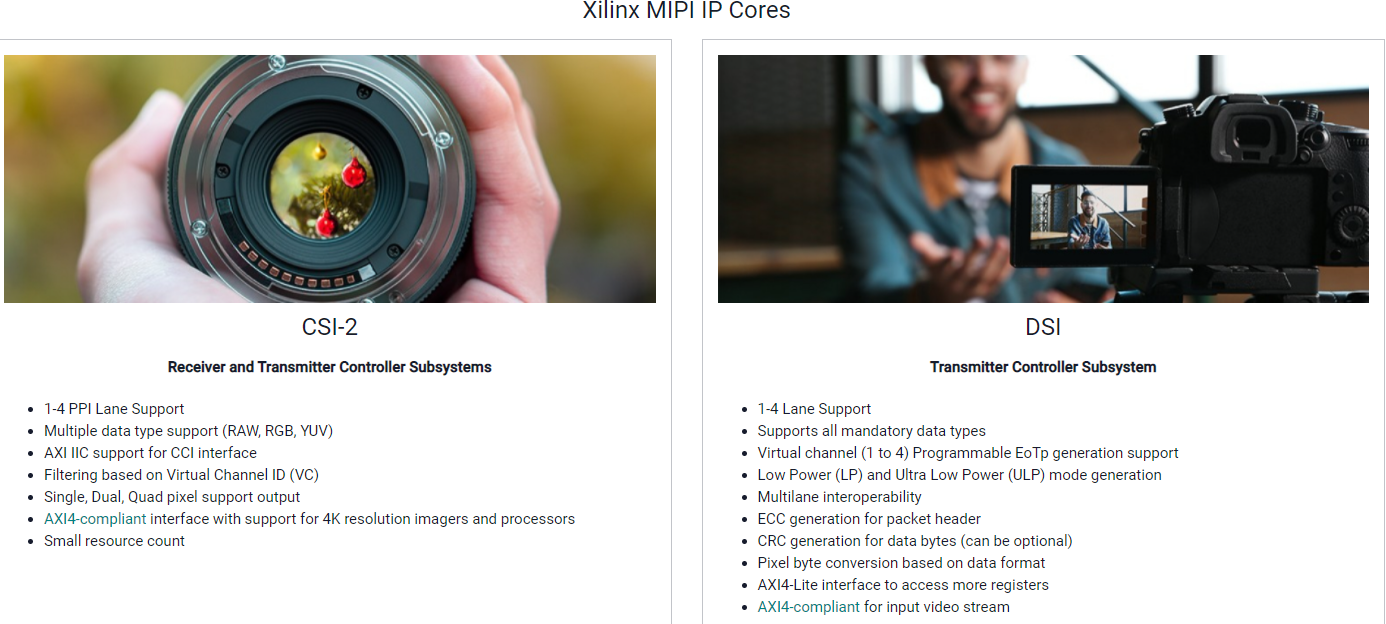
Xilinx MIPI IP Cores*
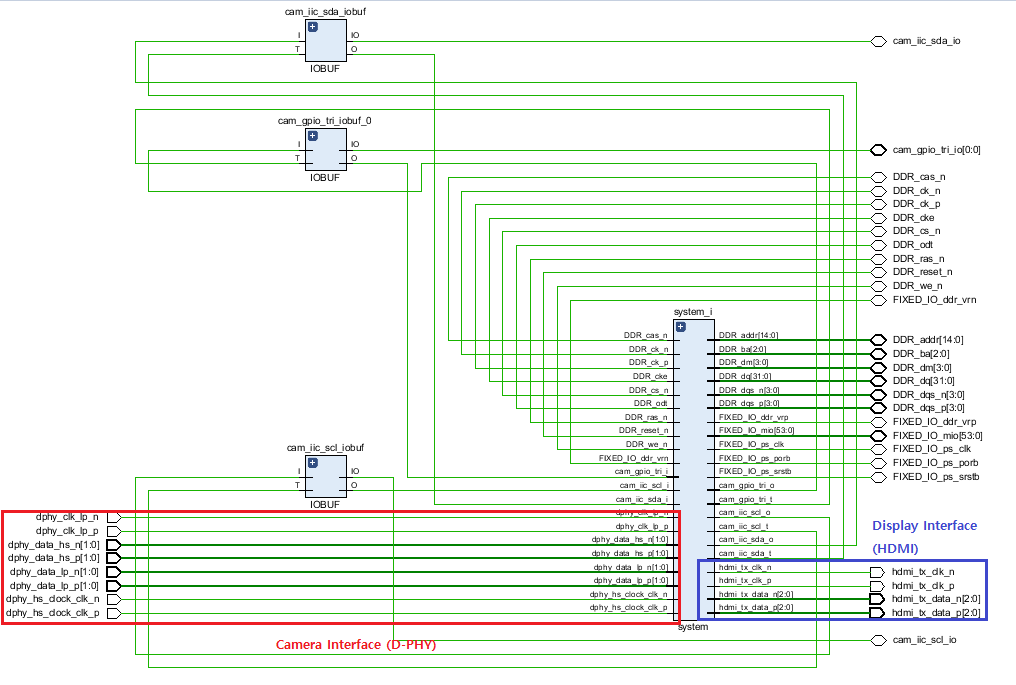
Zybo z7-20 보드와 PCam 5C 카메라를 연결한 Interface는 'MIPI'이다.
MIPI의 CSI라는 interface를 사용했고 D-PHY도 이용하였다. 이 부분은 위의 IP 파일 분석에서 * 쳐진 항목으로 확인할 수 있다.
그래서 카메라 interface에 관련된 IP는 아래 2가지라고 볼 수 있다.
- system_MIPI_CSI_2_RX_0_0.vhd*
- system_MIPI_D_PHY_RX_0_0.vhd*

- CSI: Camera Serial Interface
- DSI: Display Serial Interface
그리고 위의 두 가지 interface는 D-PHY 라는 PHY 사양을 사용한다.
https://www.xilinx.com/support/documentation/application_notes/xapp894-d-phy-solutions.pdf
이로써 PCam 5C - FPGA Design & IP 분석을 해보았습니다.
이 분석을 한 이유는 다음 프로젝트인 'Zybo z7-20에 GigE interface의 카메라를 연결하여 영상 출력하기'로 한발짝 다가가기 위해서 였습니다.
위의 MIPI CSI와 MIPI D-PHY의 IP 파일을 GigE IP로 변경하면 될 것 같습니다.

물론 Zybo에서 제공하는 IP가 VHDL인 것부터 쉽지 않지만..(필자는 verilog만 배웠음..)
하나씩 하다보면 답이 나오겠죠.
그럼 다음 프로젝트에서 뵙겠습니다 :)
'Digital Logic > Zybo z7 프로젝트' 카테고리의 다른 글
| [Zybo z7-20 프로젝트] FPGA 보드에 'GigE Vision 카메라' 연결하기 1탄 (0) | 2021.06.25 |
|---|---|
| [Zybo z7-20 보드 실습] Pcam 5C 영상 출력 (OV5640 Register 제어) (3) | 2021.05.21 |
| [Zybo z7-20 보드 실습] Pcam 5C 영상 출력 (MIPI - HDMI) (2) | 2021.05.19 |
| [Zybo z7-20 보드 실습] ARM 프로세스 활용하기 - PS (3) | 2021.05.04 |
| [Zybo z7-20 보드 실습] IP Packaging 하는 법 (0) | 2021.05.03 |


댓글